
Whether you just bought a new house with nail holes from the previous owners or have discovered water damage from a faulty roof, you may need to repair or replace your drywall. This type of project is relatively simple but can be very expensive.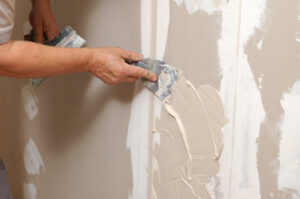
Minor blemishes like nail holes are easy to patch and can be blended with touch-up paint to make the repair undetectable. However, larger holes require a special patch and corner bead. For professional help, contact Drywall Repair Las Vegas now!
Even the most careful tenant or homeowner will have to deal with holes in drywall from time to time. A jab from a doorknob, knocks from furniture or the removal of nails or picture hooks can all leave behind a hole that needs to be patched and spackled. Small holes can be handled by a DIY homeowner with minimal experience and tools, but larger damage may require a professional contractor to cut out and replace sections of the wall or ceiling.
A handyman can apply drywall compound to the surface with a putty knife for small holes. Then he or she can sand it smooth, using either an electric sander or a manual sanding tool. Then the repair can be primed and painted to match the surrounding wall.
Larger holes require a different approach, especially if the original drywall has been torn off in a corner. In that case, the metal corner bead that covers the intersection of two pieces of drywall will also need to be replaced. This is a job for a skilled contractor, and it will take four days from start to finish.
First, the contractor will need to measure the square area of the hole and cut a replacement piece of drywall to those measurements. Then he or she will screw the new drywall into the brackets on all four sides of the hole. The contractor will then apply three coats of joint compound over the top of the replacement drywall, each one being smoothed and sanded down before applying the next.
It can be challenging to get the new drywall patch to sit flush against the wall, so a good taping job is important. After the final coat of joint compound has been applied and sanded down, the drywall contractor will apply an electrical primer and then paint to complete the job. Most people won’t be able to tell that there was ever a hole in the wall, if it is done correctly. Whether you’re a serial renter or a bona fide homeowner, knowing how to properly fix holes in drywall can be an extremely satisfying home improvement skill.
Cracks
When drywall panels are installed the seams get taped with paper for a smooth finish. If the tape becomes loose or fails a thin straight crack may appear along the seam. These cracks are usually cosmetic and easily repaired with a little drywall patching. However, if you notice cracks that are wide and jagged it’s a sign of serious trouble and it’s best to call in a professional for help right away.
Drywall chips and cracks can be caused by many different incidents ranging from furniture run-ins to a house settling. Small hairline cracks and chips are often caused by furniture rubbing up against the wall. These are easy fixes and only require a drywall patch kit to fix. Cracks and chips that are a result of house settling should be addressed by a professional immediately, as they could be a sign of structural damage that will worsen over time.
Cracks that are the result of normal settling are a common problem for homeowners and should not be considered a serious issue as long as they don’t affect doors or windows. Homes settle as they sink into the ground and this causes stress on drywall. This is especially true of new construction homes that go through a settling period for the first few years after being built.
If a crack appears in your home’s drywall, use a utility knife to cut through the tape at both ends of the crack (Image 1). Scrape and tear away all loose tape. Then carefully use a utility knife to widen the crack and remove any old compound that is leaking into the stud cavity (Image 2). This will allow you to fill in the crack with new joint compound.
The new drywall compound should be applied in several coats, each one being slightly thicker than the previous one. This will ensure that the crack is completely filled and sanded down to a smooth surface (Image 3). It is important to use mesh joint tape on the edges of the repair to strengthen the patch, reduce shifting and help prevent future cracks (Image 4).
For a final step, you should apply a couple more coats of sanding to make sure the entire area is smooth and ready for painting. If you find that the crack has recurred, try using a heavier-weight compound and sanding it down more aggressively with a sanding sponge.
Termites
If your home has a termite infestation, you’ll want to get it taken care of right away. Termites are notorious for their ability to cause structural damage to homes, and they can even destroy the integrity of drywall. Termites love to eat cellulose, which is found in all wood products and is a component of drywall. As a result, they’ll chew through the drywall and ruin its structure.
The good news is that gypsum boards (the most common type of drywall) are designed to resist termite attacks. The gypsum core of a drywall board is sandwiched between two layers of special paper. This prevents the drywall from being able to absorb moisture and makes it harder for termites to access.
However, if the paper front of your drywall gets damaged due to a termite attack, this can create an open path for moisture to enter the wall and cause a lot more damage. The first thing you should do if you suspect that your drywall is termite-ridden is contact a pest control expert to perform an inspection of your home.
Drywood termites can be more difficult to detect than subterranean termites, but if you spot tiny pin holes in your walls, wallpaper, or drywall it’s a good sign that you have a termite problem. These pin holes are created when the termites chew through the paper coating on the drywall or wallpaper. The holes are typically capped with a small dirt speck.
In addition to the pin holes, you may also notice mud tubes on your walls. These tubes are a sign that the termites are traveling from their colony to other areas of the house through a network of tunnels. Mud tubes are often filled with soil and other debris, so they can be hard to spot unless you’re looking for them.
A simple way to check for termite damage in your drywall is by gently tapping on the surface of your wall. If it sounds hollow, you likely have a severe termite problem in your home. If the sound is a little more distinctive, you can compare the noise to another wall to see if it’s different.
Water Damage
Drywall can be a sturdy material, but it is also vulnerable to water damage. When drywall gets wet, it becomes heavy and can cause the nails that hold it up to become loose or even pop out of the wall. Water damaged drywall can also lead to rotting, warping, and mold growth. It is very important to fix any problems with wet drywall as soon as possible. Leaving wet drywall to sit for days can lead to severe structural problems and is the perfect breeding ground for bacteria and mold.
Water damage can occur from flooding, a leaking roof, condensation, or even just a sprinkler that accidentally falls on the drywall. Repairing drywall that has been damaged by water is a relatively simple process. The first step is to remove any items that may be attached to the wall and thoroughly wash down the area with hot soapy water. This will help to remove any visible stains caused by the water damage. It is a good idea to use an area fan and plug in a dehumidifier to help with air circulation around the affected area. On average, it takes about three days for wet drywall to fully dry.
The next step is to figure out where the studs are on either side of the damaged section and cut out a square or rectangle so that you can match up with a new piece of drywall. You should then use a level to find out how much the drywall has sagged. If it has sagged more than 3/8 of an inch, it is likely not structurally sound and should be replaced.
Once the drywall has been repaired, it is important to use a primer to ensure that the wall is ready for paint. This step is important because it will prevent the drywall from becoming stained by the colors that you plan on using. It is also a good idea to touch up the joint compound that has been used to repair the hole with sandpaper, so that any ridges are smoothed out. After this, you can apply a few coats of the paint of your choice.